How to Use MovieCaptioner
Importing Text Transcripts
Saving Text Files Properly for Import
Importing text files improperly can set you up for problems down the road. If you import a text file saved from Microsoft Word, for example unsupported characters can be introduced into your captions that could result in missing words or invalid caption files.
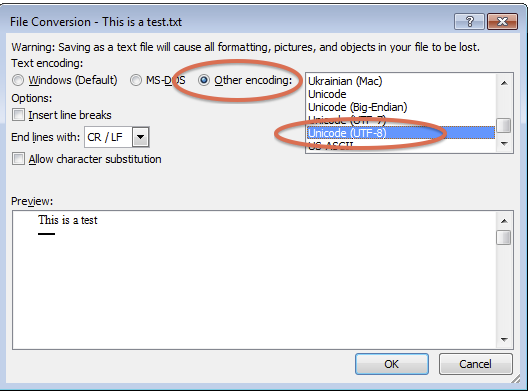
Some of these characters are curly apostrophes, smart quotes, em-dashes, em-dashes, and some others that aren't recognized by many software programs and caption formats. Before importing into MovieCaptioner, the trick is to save a text file with UTF-8 Encoding, which will substitute supported versions of those characters (such as straight quotes and apostrophes) when the encoding is changed. This option is usually present when you do a Save As in your word processing program. You would choose Plain Text, then choose the UTF-8 Encoding option. Here is an example of the Save AS window in Microsoft Word with the option for UTF-8 Encoding selected.
Importing Text Files
In this video we look at the proper way to import plain text files. It's important when you save your plain text files to use UTF-8 Encoding to eliminate unsupported characters that may cause issues with your captions. We will import text line by line and text in paragraph form in this video.
Importing Text in Paragraph Form
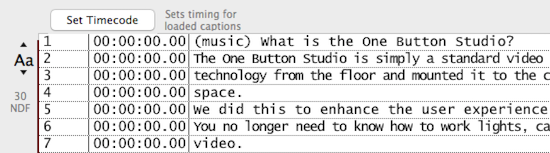
If you have paragraphs of text that you need to import into MovieCaptioner (no timecode available), then this is the option to choose. After saving your plaint text file with UTF-8 Encoding (see above) choose Text in Paragraph Form from the Import menu in MovieCaptioner. MovieCaptioner will then look at your Preferences to see how many characters to use as a means of breaking up the paragraphs into individual captions. The default is 90 characters per line, but this can easily be changed to whatever you want in the Preferences window.

After importing, you'll see that all the timecode is set to "00:00:00.00". You will need to use the Set Timecode button (< href="set_timecode.html">next page) to sync the captions with your video.
Importing Text in Line Form
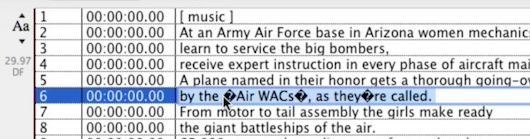
If you have text that is broken up into individual lines, you can use this import to make each line a separate caption. And, if the transcript you're importing is properly formatted (using brackets around the timecode and a tab between the timecode and caption), MovieCaptioner can import it with the timecode intact.

If, after importing, your transcript did not include timecode, you'll see that all the timecodes will be set to "00:00:00.00". You will need to use the Set Timecode button (next page) to sync the captions with your video.
Other Import Options
MovieCaptioner has lots of different caption file formats that it can import. If the caption file is formatted correctly you can use its import option to import it into MovieCaptioner with the captions intact. A few that use a particular formatting that need to be noted are Tab-Delimited Text, CART File, and CC_Output.
The Tab-Delimited Text and CART File options will look for tabs between the timecodes and the captions. If you instead have spaces or commas, try doing a Find/Replace in your text editor to add tabs between the timecodes and captions.
The CC_Output option looks for a "*T" that will denote a timecode line.
Next Up...Setting Timecode »»